对于MyBatis_plus的学习总结
使用mybatis_plus
首先由于mybatis_plus是在mybatis上的一层无侵入的封装,所以它是依赖mybatis的,因此需要导入所有mybatis相关的包
然后导入mybatis_plus的包
然后将mybatis的SqlSessionFactory替换成mybatis_plus的MybatisSqlSessionFactory即可(简单来讲就是替换一下工厂类即可)
之后就可以开始用了:
接口:
// BaseMapper<Student>中的Student告诉mybatis_plus如果要生成基础sql查询,请参考Student类及其属性
public interface StudentMapper extends BaseMapper<Student>{}
测试:
// 获取String容器对象
ApplicationContext ac = new ClassPathXmlApplicationContext("applicationcontext.xml");
// 获取StudentMapper接口的实例化对象
StudentMapper studentMapper = (StudentMapper) ac.getBean("studentMapper");
//// 查询
// selectList方法:查询所有的学生信息
List<Student> students = studentMapper.selectList(null);
// selectById方法:根据id查询
Student student = studentMapper.selectById(1);
// selectByMap方法:根据指定条件完成查询
Map<String, Object> map = new HashMap<>();
map.put("s_name", "张三");
map.put("sage", 20);
List<Student> stds = studentMapper.selectByMap(map);
// selectBatchIds方法:根据id集合查询数据
List<Integer> ids = new ArrayList<>();
ids.add(1);
ids.add(2);
List<Student> stds = studentMapper.selectBatchIds(ids);
// 新增学生信息
Student s = new Student();
s.setAge(1);
s.setName("qq");
int i = studentMapper.insert(s);
// 修改学生信息
Student s1 = new Student();
s1.setId(1);
s1.setName("yy");
int i = studentMapper.updateById(s1); // 只更新有值的属性,null值的属性不参与更新
//// 删除学生信息
// deleteById方法:根据ID删除学生信息
int i = studentMapper.deleteById(1);
// deleteMap方法:根据指定字段完成数据删除
// 注意:传入的map集合中存储了要删除的数据的键值对,键名为数据库中的字段的名称,而不是实体类的属性名
Map<String, Object> map = new HashMap<>();
map.put("s_name", "赵六");
map.put("sage", 40);
int i = studentMapper.deleteByMap(map);
// deleteBatchIds方法:多选删除,将符合ID要求的数据全部删除
// 参数:存储了要删除的数据的id的集合
List<Integer> ids = new ArrayList<>();
ids.add(1);
ids.add(2);
int i = studentMapper.deleteBatchIds(ids);
Mybatis-Plus配置文件详解
参考:https://blog.csdn.net/Huang_ZX_259/article/details/122562231(MyBatis-Plus——超详细讲解配置文件)
注解
@TableName、@TableId与@TableField
由于mybatis_plus是根据实体类来反向推测可能用到的sql查询从而免去我们手动写基本sql查询的,而有时候实体类类名或属性和数据库表名或字段名不一定对的上,这个时候就需要用@TableName(“表名”)和@TableField(“字段名”)的方式来指定了
@TableId是在实体类对应的主键属性上使用的,用来表明该属性是主键,并且需要说明主键的设置类型,比如:自增。
而且加了@TableId这个注解之后可以实现主键回填(那么为什么不加的时候新增还是可以做到数据库表中的主键自增,但是回填的时候实体类的主键还是为null呢?那是因为新增的时候mbp一看实体类有个属性跟数据库表的主键对上了,那就会判定这个属性就是主键,那就会正常生成记录并自增主键,但是回填的时候它没法判断谁是主键,因此没法回填主键)
其他注解及属性请看mybatis_plus官方文档
需要注意的是@TableField注解有一个属性叫exist,它可以用来排除实体类字段。我们知道mp默认实体类所有属性都对应到数据表的字段,但是有些属性是不存在于数据表的(或者说是我们自己加的属性,但是不希望mp把它当成数据表的某个字段),此时就可以这么用:
@TableField(exist = false)
private String customid;
Wrapper条件构造器
用于完成复杂sql
具体实现类:QueryWrapper
举例:
/*
* 条件构造器是以Java对象的形式将数据操作的筛选条件描述出来,然后由mp将其翻译成对应的sql判断并拼接在sql语句上
*/
// 获取String容器对象
ApplicationContext ac = new ClassPathXmlApplicationContext("applicationcontext.xml");
// 获取StudentMapper接口的实例化对象
StudentMapper studentMapper = (StudentMapper) ac.getBean("studentMapper");
// 创建条件构造器对象
QueryWrapper<Student> queryWrapper = new QueryWrapper<>();
// queryWrapper.eq("sage", 20);
// queryWrapper.or();
// queryWrapper.eq("s_name", "张三");
// 或者可以这么写:
queryWrapper.eq("sage", 29).or().eq("s_name", "张三");
// 根据条件查询数据
List<Student> stds = studentMapper.selectList(queryWrapper); // 同理增删改,具体看文档
分页器配置
可以在Spring的applicationcontext.xml配置文件中配置:
<!--配置工厂bean-->
<!--配置了这个bean意味着mp的SqlSessionFactory就会变成这个bean,后续的sql操作要用到的SqlSession就会通过它来实例化-->
<bean id="factory" class="com.baomidou.mybatisplus.extension.spring.MybatisSqlSessionFactoryBean">
	<!--配置mp分页插件-->
    <!--下面的标签(property、array、bean)表示它是一个数组属性,属性名为plugins,数组里面装了bean-->
    <property name="plugins">
    	<array>
        	<!--配置分页插件:拦截对象-->
            <bean id="page" class="com.baomidou.mybatisplus.extension.plugins.PaginationInterceptor">
                <!--value="mysql"表示指定方言为mysql,指明要进行分页操作的数据库-->
            	<property name="dialectType" value="mysql"></property>
            </bean>
        </array>
    </property>
</bean>
测试:
// 获取String容器对象
ApplicationContext ac = new ClassPathXmlApplicationContext("applicationcontext.xml");
// 获取StudentMapper接口的实例化对象
StudentMapper studentMapper = (StudentMapper) ac.getBean("studentMapper");
// 创建Page对象封装分页查询条件
IPage<Student> page = new Page<>(1, 2);
// 查询
IPage<Student> studentIPage = studentMapper.selectPage(page, null);
// 分页查询结果
studentIPage.getRecords();
// 分页总共的数据量
studentIPage.getTotal();
// 分页总共的页码量
studentIPage.getPages();
// 其他还有很多方法...
全局配置策略
场景:
假如我们每个实体类和数据库中的表名都不一致,表的格式都是t_表名,但是类名没有t_前缀,比如t_student表和Student类。这样每个实体类上我们都要使用@TableName注解来表明类和表的映射关系,很麻烦
解决:
使用MP的全局配置策略。GlobalConfig
作用:
配置表和类名映射关系的前缀
配置全局主键自增
进入MybatisSqlSessionFactoryBean.java文件我们会发现它有一个属性:
private GlobalConfig globalConfig;
那么事实上我们就是需要配置并注入这个属性
配置示例:
<!--配置mp的全局策略-->
<bean id="globalConfig" class="com.baomidou.mybatisplus.core.config.GlobalConfig">
	<!--配置数据库全局默认的映射关系-->
    <property name="dbConfig">
    	<bean id="dbConfig" class="com.baomidou.mybatisplus.core.config.GlobalConfig$DbConfig">
        	<!--声明全局默认类名的对应的表的前缀-->
            <property name="tablePrefix" value=
"t_"></property>
            <!--配置全局主键自增-->
            <property name="idType" value="AUTO"></property>
        </bean>
    </property>
</bean>
配完上面的配置后,再将上面的配置注入MybatisSqlSessionFactoryBean:
<!--配置工厂bean-->
<!--配置了这个bean意味着mp的SqlSessionFactory就会变成这个bean,后续的sql操作要用到的SqlSession就会通过它来实例化-->
<bean id="factory" class="com.baomidou.mybatisplus.extension.spring.MybatisSqlSessionFactoryBean">


    <!--配置全局策略-->
    <property name="globalConfig" ref="globalConfig"></property>


	<!--配置mp分页插件-->
    <!--下面的标签(property、array、bean)表示它是一个数组属性,属性名为plugins,数组里面装了bean-->
    <property name="plugins">
    	<array>
        	<!--配置分页插件:拦截对象-->
            <bean id="page" class="com.baomidou.mybatisplus.extension.plugins.PaginationInterceptor">
                <!--value="mysql"表示指定方言为mysql,指明要进行分页操作的数据库-->
            	<property name="dialectType" value="mysql"></property>
            </bean>
        </array>
    </property>
</bean>
这样我们就不需要给每个实体类都加上t_前缀了(换句话说实体类上的@TableName(“t_xxx”)就不需要了)
而且我们还设置了默认主键自增,因此@TableId(type=IdType.AUTO)中的type属性也不需要写了,也就是说只需要写@TableId就行了
Mybatis Plus 处理器
有诸如MetaObjectHandler等,可以参考张润华的supcon-parent或者网络资料
MyBatis Plus SQL注入器(SqlInjector)
参考:
https://blog.csdn.net/qq_44824164/article/details/140081872(【第24章】MyBatis-Plus之SQL注入器)
https://www.jb51.net/program/320701w60.htm(MybatisPlus更新为null的字段及自定义sql注入)
https://blog.csdn.net/qq_42472539/article/details/135859158(【MybatisPlus深入使用指南】mybatisplus创建自定义方法sql注入器,批量操作详细(涵盖主键生成))
AR模式
AR模式中不需要再获取Mapper对象,然后再将实体类传入给mapper层完成数据库操作,直接使用实体类即可完成操作(pojo实体类就会有增删改查功能),提高开发效率(其实实体类调用的增删改查底层还是在调用mapper,而且这个mapper我们还是得创建,不然它找不到)
使用示例:
pojo文件:
public class Student extends Model{
    @TableId
    private Integer sid;
    @TableField("s_name")
    private String sname;
    private Integer sage;
    ...
    // 重写pkVal方法,注意这一步是必须要做的
    @Override
   	protected Serializable pkVal(){
        return sid;
    }
}
mapper接口:
public interface StudentMapper extends BaseMapper<Student>{
}
测试文件:
// 测试AR模式
// 获取Spring容器类对象
ApplicationContext ac = new ClassPathXmlApplicationContext("application.xml");
// 获取Student的实体类对象
Student stu = new Student();
// 使用AR模式操作数据库
//// AR查询
// 查询所有
List list = stu.selectAll();
// 根据ID查询
// 方式一
Student stu = (Student)stu.selectById(1);
// 方式二
stu.setSid(1);
Student stu = (Student)stu.selectById();
// 其他的增删改可以自行测试,唯一要注意的是原先使用mp的时候比方说增加,可能是这么写的:xxx.insert(stu);但是现在的话它实体类本身就是有属性的,可以直接这么写:stu.insert();

//// AR新增
Student stu = new Student();
stu.setAge(11);
stu.setName("qq");
boolean i = stu.insert();

//// AR更新
Student stu = new Student();
stu.setId(1);
stu.setName("yy");
boolean i = stu.updateById();

//// AR删除
Student stu = new Student();
stu.setId(1);
boolean i = stu.deleteById();

// 还有update(Wrapper queryWrapper)、delete(Wrapper queryWrapper)等方法(条件更新、条件删除等),具体的去看文档
mbp代码生成器
作用:根据数据库中的表动态生成表对应的mapper,service,pojo,controller层的基础代码,提升开发效率
1、导入代码生成器相关jar包

2、直接运行下面的代码就好了
public class TestCode {
    public static void main(String[] args) {
        // 代码生成器
            AutoGenerator mpg = new AutoGenerator();
        //全局配置策略
            GlobalConfig gc = new GlobalConfig();
            String path = System.getProperty("user.dir");//动态获取当前项目的路径
            System.out.println(path);
            gc.setFileOverride(false);// 是否覆盖同名文件,默认是false
            gc.setActiveRecord(true);// 不需要ActiveRecord特性的请改为false
            gc.setEnableCache(false);// XML 二级缓存
            gc.setBaseResultMap(true);// XML ResultMap
            gc.setBaseColumnList(false);// XML columList
            gc.setOutputDir(path+"/09-mp-code/src");
            gc.setIdType(IdType.AUTO);//设置主键策略

        //数据源配置
            DataSourceConfig dsc = new DataSourceConfig();
            dsc.setUrl("jdbc:mysql://localhost:3306/mp?useUnicode=true&useSSL=false&characterEncoding=utf8");
            // dsc.setSchemaName("public");
            dsc.setDriverName("com.mysql.jdbc.Driver");
            dsc.setUsername("root");
            dsc.setPassword("1234");

        // 包配置
            PackageConfig pc = new PackageConfig();
            pc.setParent("com.bjsxt")
                    .setMapper("mapper")
                    .setService("service")
                    .setController("controller")
                    .setEntity("pojo")
                    .setXml("mapper");
        //策略配置
            StrategyConfig stConfig = new StrategyConfig();
            stConfig.setCapitalMode(true) //全局大写命名
                    .setNaming(NamingStrategy.underline_to_camel) // 数据库表映射到实体的命名策略
                    .setTablePrefix("t_")
                    .setInclude("t_student"); // 生成的表,多个表继续传递即可,String类型的可变参数

        //将策略配置对象集成到代码生成器中
            mpg.setGlobalConfig(gc);
            mpg.setDataSource(dsc);
            mpg.setPackageInfo(pc);
            mpg.setStrategy(stConfig);
            //执行生成
            mpg.execute();
    }
}
自定义代码模板
mbp默认是提供代码模板的,但有时候默认的模板比较简单,无法满足实际需要,这个时候就需要自己定义代码模板
mbp自带的默认模板:
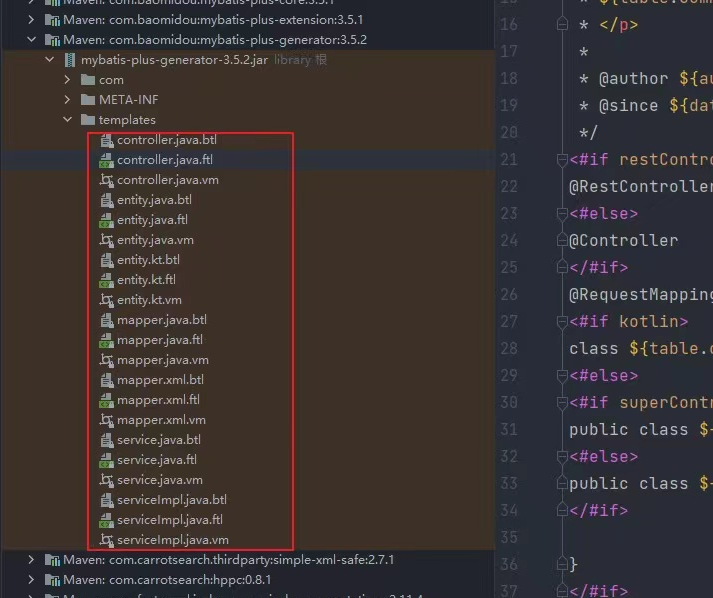
自定义模板请参考:张润华generator-spring-boot-starter项目
Mybatis-plus动态数据源配置
参考:https://www.cnblogs.com/zhaww/p/12706941.html(mybatis-plus动态数据源配置)
插件
多表插件mybatis-plus-join
参考:https://blog.csdn.net/mahuibo123/article/details/125886063(mybatis-plus-join mybatis-plus必备神器)、https://blog.csdn.net/weixin_39555954/article/details/128217887(Mybatis-plus-join连表查询)
lombok插件
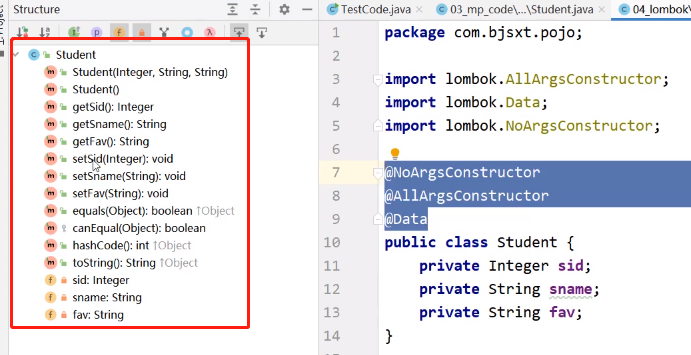
用了Lombok注解之后,虽然看似Java代码中没写setter、getter等方法了,但其实等它被编译成.class文件之后,setter、getter等方法还是会在的,而且该.class文件跟不加LomBok注解之前的Java文件编译成的.class文件是一样的
如果idea要用的话需要先下载一个lombok插件,因为在idea中写的Java代码是由idea去编译的,而idea不支持也不认识lombok,所以要先下个lombok插件:
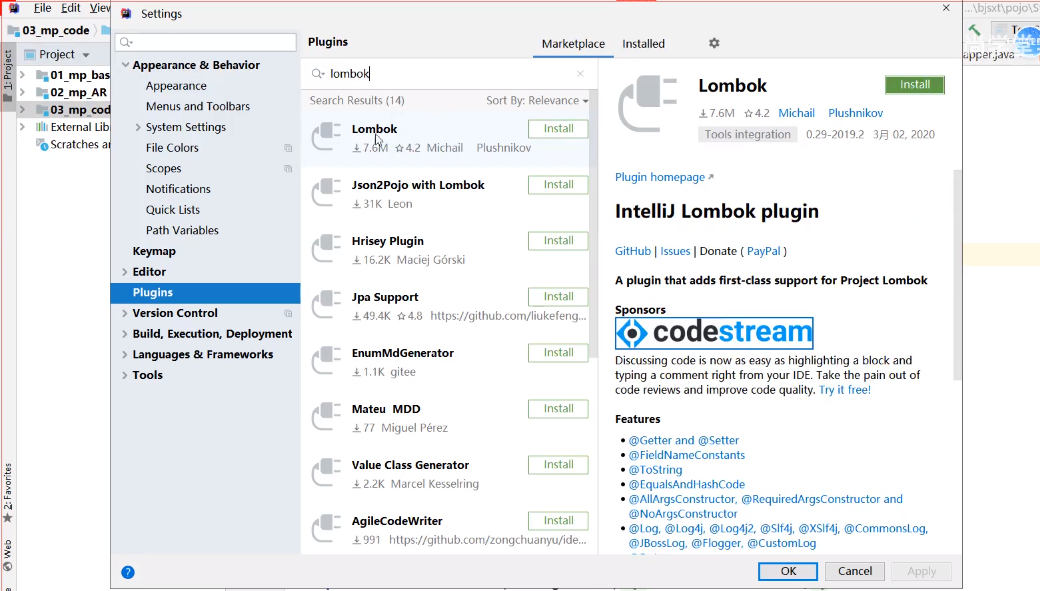
然后还要开启idea的注解处理:
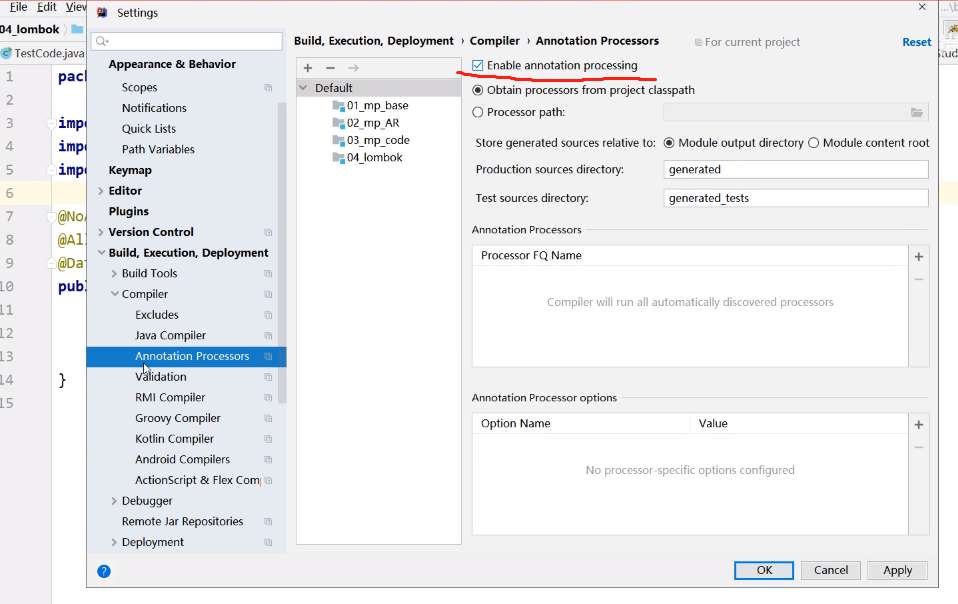
之后就能用了:
@NoArgsConstructor
@AllArgsConstructor
// @Getter
// @Setter
// @ToString
@Data
public class Student{
    private Integer sid;
    private String sname;
    private String fav;
}
MybatisX插件
MybatisX 是一款基于 IDEA 的快速开发插件,为效率而生。安装方法:打开 IDEA,进入 File -> Settings -> Plugins -> Browse Repositories,输入 mybatisx 搜索并安装。
- Java与mapper.xml来回跳转
- Mapper方法自动生成XML